
Skin tone correction using RGB Curves in Lightroom 5
When it comes to editing skin tones, Adobe Photoshop has always reigned supreme. Lightroom could change the white balance and even alter the Hue, Saturation, and Luminance values, but this is often not accurate enough to render great skin tones.
This changed with the introduction of RGB curves in Lightroom 4, allowing us to change the values of Red, Green & Blue at a specific tonal range of the image. How this changes things will be explained below, but suffice to say it makes for much nicer skin tones without the need to export to photoshop.
(Not exporting to photoshop has numerous benefits including file size, no duplicate files, and all changes stay non-destructive.. Not to mention speed of workflow)
So let’s get to it..

The image above, straight from camera looks pretty good to start with.. And if you are not looking for a colour cast it would be easy to miss the slightly red/magenta skin tones. (See before and after image at the end of the post for a comparison)
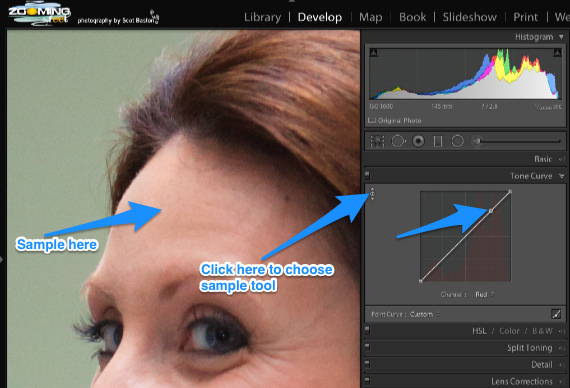
Select the sample tool in the top left of the tone curve panel and sample the colour on your selected area on the forehead by click on it. This creates a point on your red channel tone curve.
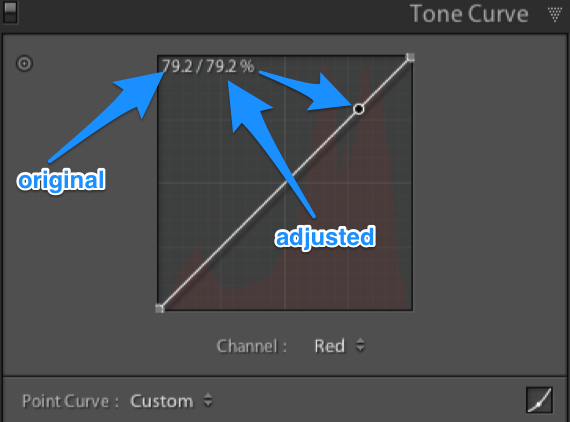
Hovering over the newly added point on the tone curve shows two figures in the top left of the tone curve. The first number is the original value of red, while the second number is the adjusted value. We will be adjusting these values to make better skin tones, but not yet!
Repeat the steps above for both the green channel and the blue channel being careful to sample from the same point as the red sample.
Having sampled the information from the Red, Green and Blue channels we can see (by hovering over our selection points in each channel) that our original values are as follows..
Now repeat the same procedure for the Blue channel, remembering to hold the shift key. Changing the value from 62.4 to 61.8
As you can see below this has already made the skin tones more pleasing
At this point, we have made no adjustments to the Green channel. The green channel in this method is to account for personal preference and individual differences in skin tone.
Select the sample tool in the top left of the tone curve panel and sample the colour on your selected area on the forehead by click on it. This creates a point on your red channel tone curve.
Hovering over the newly added point on the tone curve shows two figures in the top left of the tone curve. The first number is the original value of red, while the second number is the adjusted value. We will be adjusting these values to make better skin tones, but not yet!
Repeat the steps above for both the green channel and the blue channel being careful to sample from the same point as the red sample.
Having sampled the information from the Red, Green and Blue channels we can see (by hovering over our selection points in each channel) that our original values are as follows..
Now repeat the same procedure for the Blue channel, remembering to hold the shift key. Changing the value from 62.4 to 61.8
As you can see below this has already made the skin tones more pleasing
At this point, we have made no adjustments to the Green channel. The green channel in this method is to account for personal preference and individual differences in skin tone.
Warning: there will be a little bit of math involved in this post, but I promise it will be really simple
First thing to check is that you have the current process version checked in Colour Calibration tab in the Develop module. This technique will only work for process version 2012 onwards.

With the process version set to 2012, change to the Tone curve panel as shown below and zoom in on the face of your subject. Choose a point of medium tone on your models face, the forehead is often a good place to choose. We will be using this point to make our selections in the three separate red, green and blue curves channels, so remember where you select.

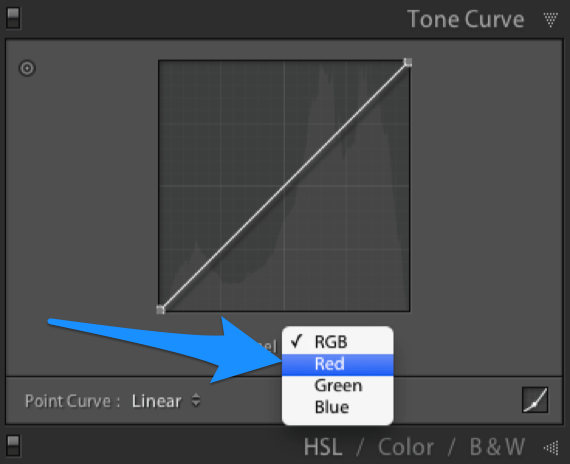
As shown below, change the tonal curve from the composite RGB channel to the red channel.


Red = 79.2, Green = 70.2 and Blue = 62.4
Now comes the math..
(Red – Blue)/2
79.2-62.4= 16.8
16.8/2= 8.4
8.4 is our adjustment value.. To get the new number for the red and blue channel simply do the following
new Red = 8.4 + 70.2 (Green) = 78.6
new Blue = 70.2 (Green) – 8.4 = 61.8
What this achieves is a good balance between the red, green & blue channels at the point of skin mid tones.
To change the values of the red channel, select the red channel and then while holding down the shift key to limit adjustments to vertical.. Drag our selection point on the curve from 79.2 to our new value of 78.6 as shown below.
NB! It is not possible to get the number exact but get as close as you can


Using the same method as the other two channels, holding the shift key and dragging the green channel until you find a pleasing look. The two signs you’ve gone too far is that either blond hair has a slight tinge of green or skin tones have too much magenta. Small adjustments are key here.


As you can see above in the before and after. These simple changes have made a subtle but significant improvement to the skin tones.
NB! When taking account of darker skin, you may find that you need to lower the value of the red channel by a small amount to avoid an oversaturated look.
I hope that you have found this tutorial helpful and would appreciate your comments below.
I would also like to thank Lee Varis for the inspiration for this post as his work on CMYK skin correction is the basis of this Lightroom post


Comments
Post a Comment