Posts

Subscribe To Farah

Enter your email address:

Delivered by FeedBurner

RSS FEED

 Photography and adobe Photoshop

How to Make an Animated GIF in Photoshop [Tutorial]

Image
  How to Create an Animated GIF in Photoshop Here's an example of an animated GIF you might make using this tutorial: Alright, let's get started. Step 1: Upload your images to Photoshop. If you already have images created ... Gather the images you want in a separate folder. To upload them into Photoshop, click  File  >  Scripts  >  Load Files Into Stack. Then, select  Browse,  and choose which files you'd like to use in your GIF. Then, click  OK. Photoshop will then create a separate layer for each image you've selected. Once you've done that, skip to step two. If you don't already have the series of images created ... Create each frame of the animated GIF as a different Photoshop layer. To add a new layer, chose  Layer  >  New  >  Layer. Be sure to name your layers so you can keep track of them easily when you make your GIF. To name a layer, go to the  Layer panel  on the bottom r...

The Amazing Power of Frequency Separation Retouching in Photoshop download the free action of Frequency Separation Retouching

Image
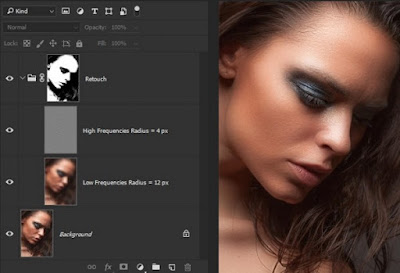
Retouching has never been more simple! Frequency Separation splits texture from color and makes retouching skin much easier! What is Frequency Separation? Frequency Separation helps make Retouching a portrait easier in Photoshop. Frequency separation works because it allows you to separate the Texture of an image from the tone and Color. When Retouching you can focus on just the texture or the skin beneath it. It sounds quite complex but in practice, it is quite simple. If you want to work with texture, choose the high-frequency layer, if you want to work with skin choose the low-frequency layer. Getting Started with Frequency Separation To get your image set up for frequency separation, you will have to make 2 copies of your background layer. If you are not starting from the beginning, add a stamp visible over all layers by typing CTRL+ALT+OPTN+E. One of these copies will be for your low frequency (skin) and one will be for your high-frequency texture. First, apply a Gaussian Blur to ...

Ultimate Retouch Panel for Adobe Photoshop (Windows/Mac) its free now for limited time download it now

Image
Ultimate Retouch Panel 3.5 for Adobe Photoshop The Ultimate Retouch Panel 3.5 has been producing for a long time. This isn't the last update in light of the fact that there's increasingly more new repair apparatuses and strategies. After variant 2.0, I began to tune in to my customers (the two picture takers and retouchers). They gave me numerous thoughts about what to add to the board from their perspectives. So the Ultimate Retouch Panel is a product of not the developer only, but of many people from all over the world also. This fact makes the product unique, relevant and very flexible. At the moment there are more than 200 useful functions of the panel. It can become an essential part of your workflow and keeps you away from boring technical Photoshop settings and gives you more time to focus on your work. Ultimate Retouch panel includes blocks for the base correction, so for retouching, toning and color correction, effects and has 20 programmable buttons for your own actio...

Millenium Panel Build 12.2016 For Adobe Photoshop (Windows/Mac) its free now for limited time download it now

Image
Millenium Panel Build 12.2016 for Adobe Photoshop (Windows / Mac) Millenium Panel is a Photoshop Panel with retouching, brushing, painting, high dynamic range, contrast sharpness, color saturation features. Within the Photoshop craft, the separation of frequencies in images can be utilized for retouching. While there are a number of ways to implement the Frequency Separation technique. Typically, we break down the information data in our images into high and low frequencies. Blending mode-Linear Light presupposes the doubling of the contrast, to compensate it we reduce Fill to 50. There’s a number of ways how to do that: – This can be achieved using Curves if you raise the black point to position (0; 64) and lower white point to position (255; 192). The central point should be fixed at (128, 128). – You can decrease contrast at Brightness/Contrast with Contrast setup at -50 and activated key Use Legacy. – Curves or Brightness/Contrast can be used on the tonal map itself (Image-Edit-Cur...

I will create a stunning decent video title for you 3

Image
https://www.fiverr.com/justvisuals/create-a-stunning-decent-video-title-for-you Beyoncé - Single Ladies (Put a Ring on It) ★★★ video intro/outro titles wedding pictures slideshow ★★★ ★★★ Welcome to my Gig ★★★ Hello! I will make video intro like in preview sample, but with your colors & settings!!!  For 10$ you will receive:  MP4 Video as gig sample with sound and tagline,  I have 50+ beautiful customizable intro/outro/openers ---------------------------------------------------------------------- I can also create a fully customized video for you  BUT I need to discuss it first  ---------------------------------------------------------------------- ALSO, I CAN Add  pictures; I can use your sound;  add text at the end of the video. I can write text instead logo (if you don't have it)